InterviewVector is an on-demand Interview as a Service marketplace that helps companies to scale their technical hiring process at lower cost and less time.
Benefits:
- Live recorded interviews by experienced professionals
- In-depth actionable expert feedback
- Recommendations you can trust from trained panelists
- Customized interview process
- Professional interview experience
Greenhouse Recruiting’s integration with InterviewVector allows you to export candidates and jobs directly from Greenhouse to InterviewVector so that you can spend less time on data entry.
- Export jobs from Greenhouse to InterviewVector
- Export the candidate details that you want to interview via Interviewvector
- Schedule the interview with the InterviewVector panel from Greenhouse dashboard only
- View candidate feedback report from the dashboard
Harvest APIs
Configure setup permissions in Greenhouse Recruiting
To configure the Greenhouse Recruiting / InterviewVector integration, you’ll need the developer permission Can manage ALL organization’s API Credentials.
To assign this permission, find a Greenhouse Recruiting user in your organization with Site Adminpermission and the user-specific permission Can edit another user's advanced permissions to update your account.
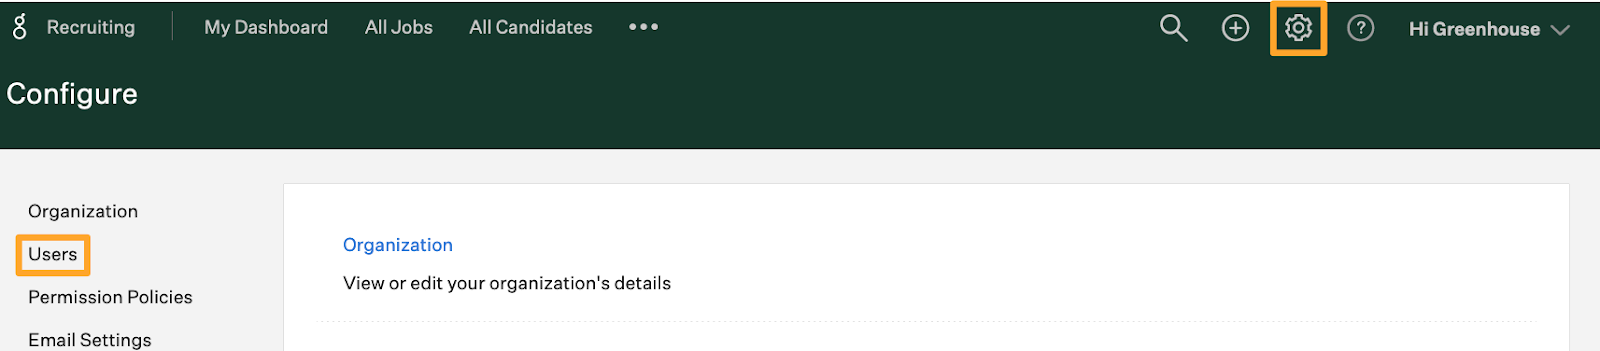
The Site Admin can update your permissions by navigating to your user page. Click the Configure icon ![]() >Users >Your Name.
>Users >Your Name.
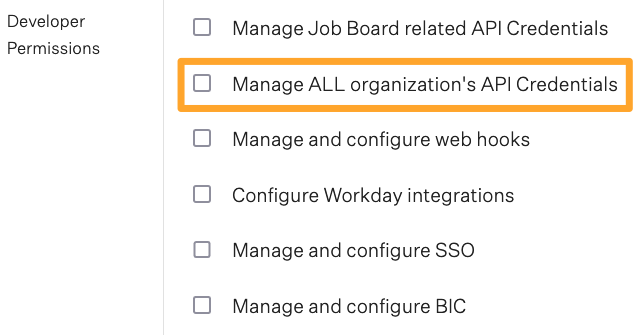
The Site Admin should scroll to the User-Specific Permissions panel on your user page and expand the Developer Permissions dropdown menu.
Select Can manage ALL organization’s API credentials in the Developer Permissions section and click Save.
Repeat as necessary for any other user that needs to set up the integration.
Create a Harvest API key for the Greenhouse Recruiting / InterviewVector integration
Note: To generate an API key, you must have the developer permission Can manage ALL organization's API Credentials.
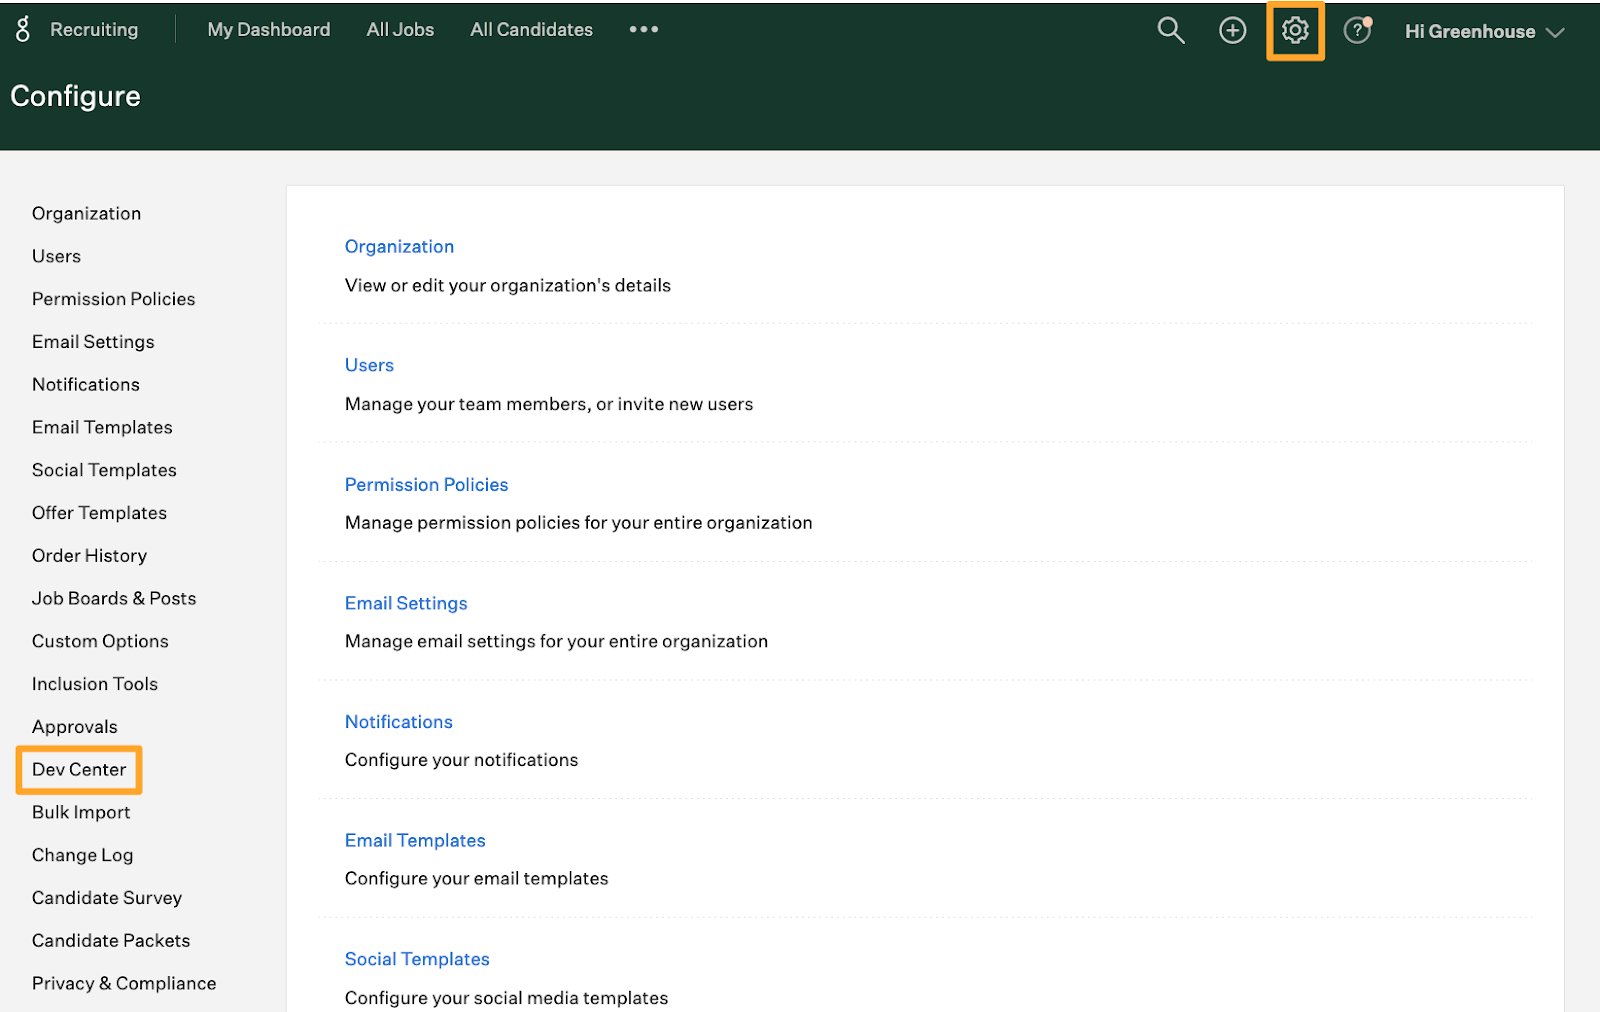
Click on the Configureicon ![]() and select Dev Center on the left.
and select Dev Center on the left.
Select API Credential Management in the Dev Center.
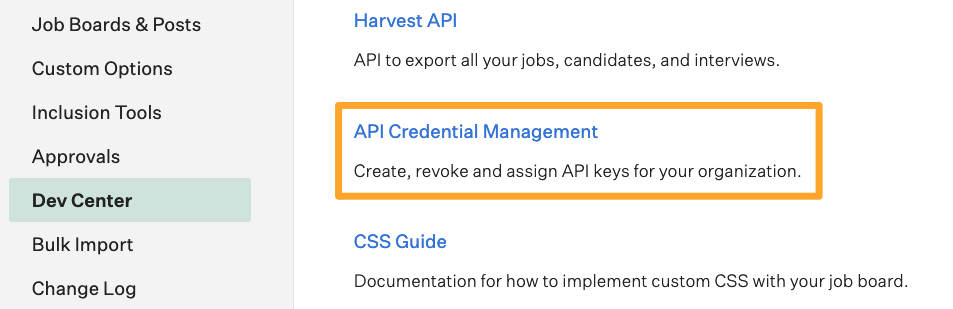
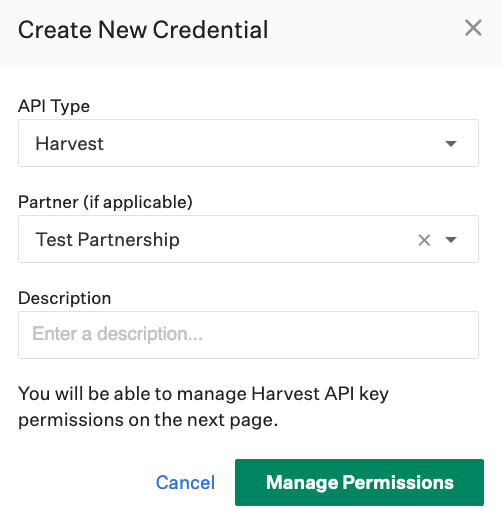
From the API Credential Management page, click Create New API Key to generate the API key for InterviewVector

In the Create New Credentialbox, make the following selections:
- API Type: Harvest
- Partner:
- Description: InterviewVector Harvest API Key
Click Manage Permissions.
Click Copy to save your API key to your clipboard. Store the API key in a secure location to provide to InterviewVector in the next step.
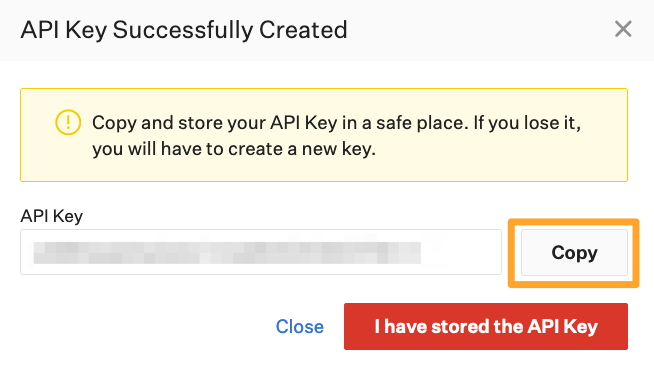
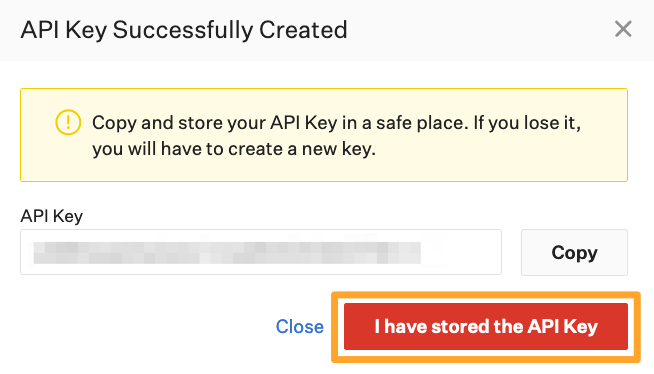
Note: You won’t be able to view the API key after clicking I have stored the API Key. If you lose your API key or need to access it later, you’ll need to generate a new key and provide it to InterviewVector.
Click I have stored the API Key once you have copied and saved the key.
Now you will see a page like this:
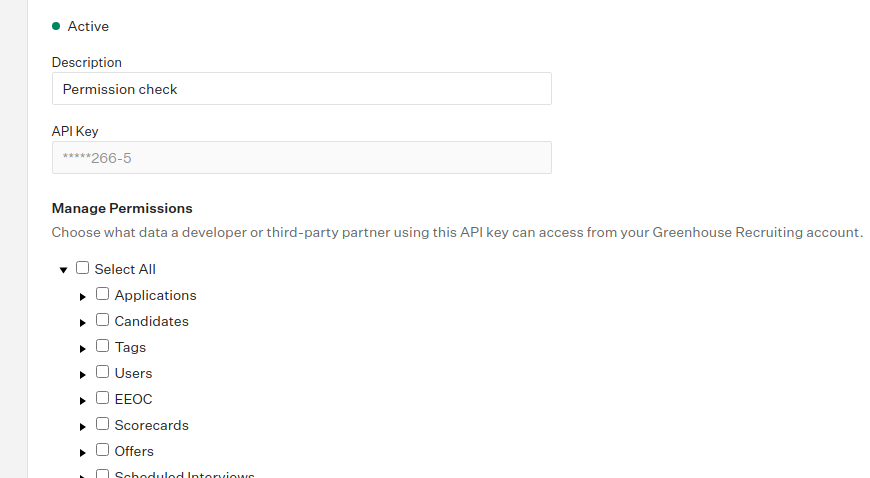
Select the checkboxes next to each permission box to associate it with the API key and click save.
The following permissions are needed for the InterviewVector integration:
Candidates
- GET: Retrieve Candidate
- POST: Add Note
Users
- GET: List Users
- POST: Add User
Scheduled Interviews
- POST: Create a scheduled interview
- PATCH: Update a scheduled interview
- DELETE: Delete a scheduled interview
Jobs
- GET: List Jobs
- GET: Retrieve Job
Job stages
- GET: Retrieve Job Stage
- GET: List Job Stages for Job
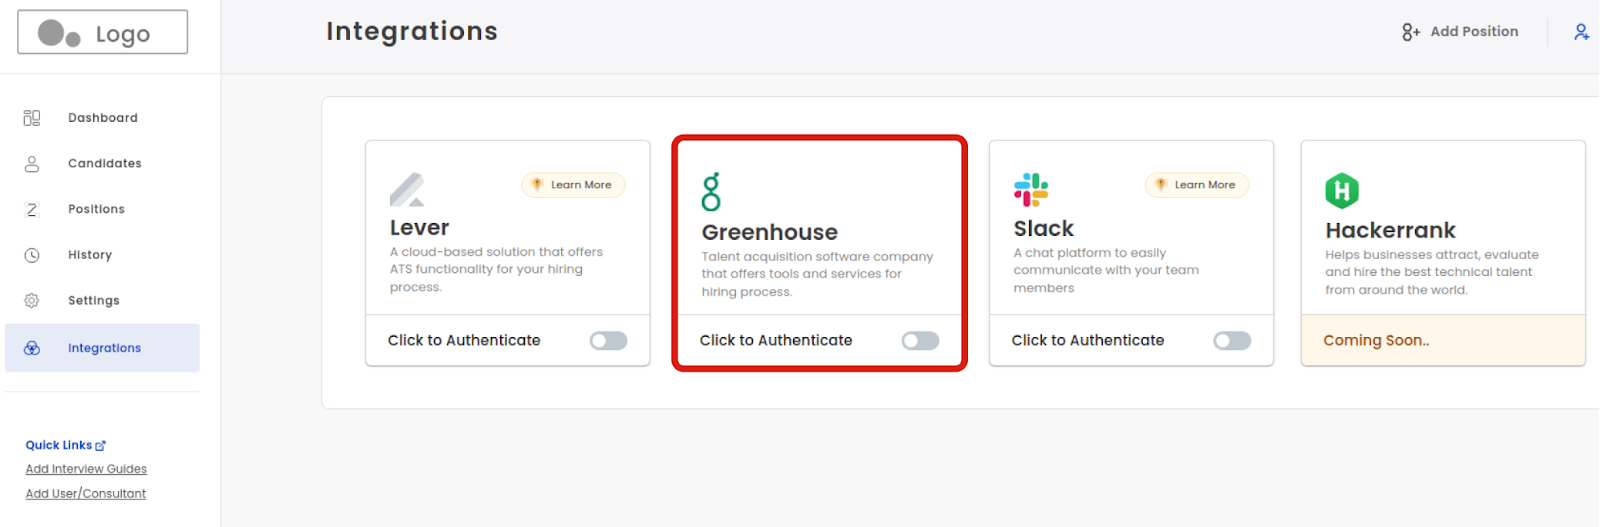
Now on InterviewVector Dashboard. Go to Integration and turn on the Click to Authenticate toggle switch on Greenhouse, as shown below.
Paste the API key copied from Greenhouse on the authentication screen as shown below. Also, enter the email of a user associated with the greenhouse account that has Site Admin permission.
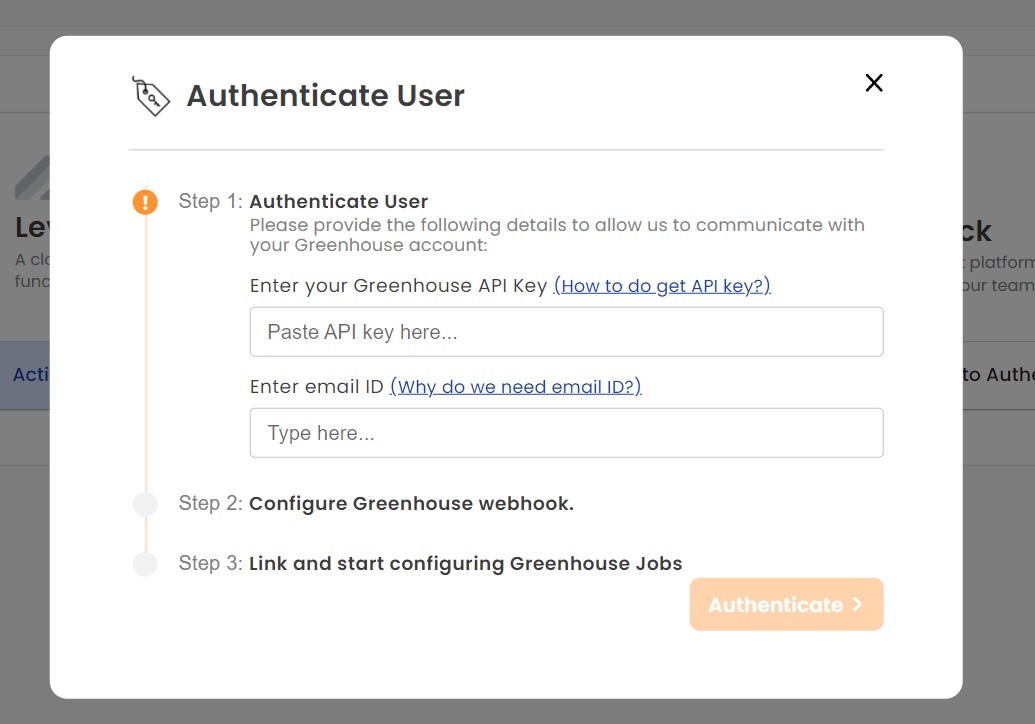
Click on Authenticate and if API Key and email ID are authenticated then you are good to go.
Webhooks
Configure setup permissions in Greenhouse Recruiting
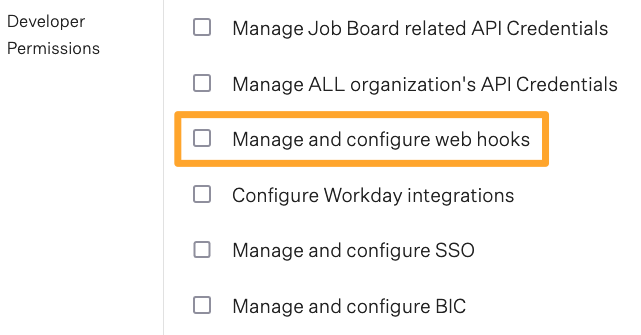
To configure the Greenhouse Recruiting / InterviewVector integration, you’ll need the developer permission Can manage and configure web hooks.
To assign this permission, find a Greenhouse Recruiting user in your organization with Site Admin permission and the user-specific permission Can edit another user's advanced permissions to update your account.
The Site Admin can update your permissions by navigating to your user page. Select Configure icon ![]() > Users > Your Name.
> Users > Your Name.

The Site Admin should scroll to the User-Specific Permissions panel on your user page and expand the Developer Permissions dropdown menu.
Select Can manage and configure web hooks in the Developer Permissions section and click Save.
Repeat as necessary for any other user that needs to set up the integration.
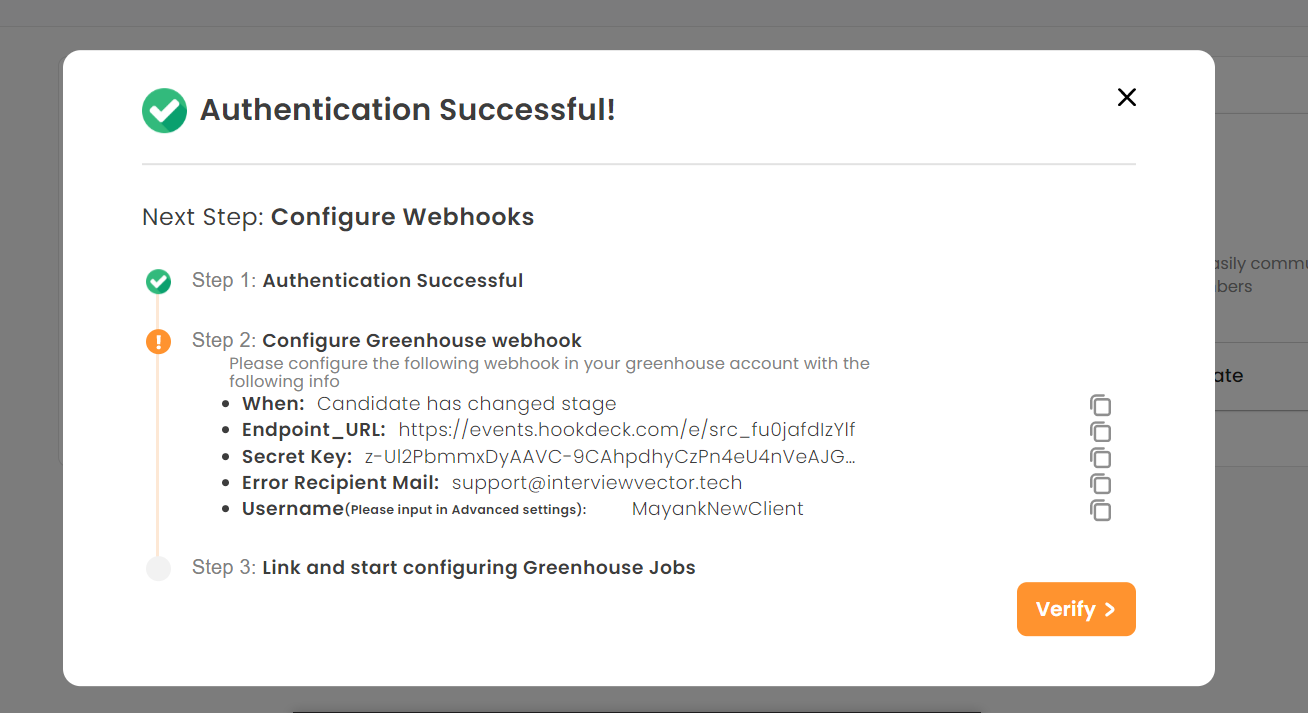
Retrieve InterviewVector’s webhook endpoint URL and secret key
To enable the Greenhouse Recruiting / InterviewVectorintegration, you’ll need the following information to steup a webhook on Greenhouse platform:
- InterviewVector’s When webhook event
- InterviewVector’sEndpoint URL
- InterviewVector’s Secret Key
- InterviewVector’s Error Recipient Mail
- InterviewVector’s Client Username
To retrieve this information please go to InterviewVector Dashboard > Integration > Greenhouse > Authenticate Harvest APIs in Step 1.
Once above steps are done, you will see this screen.
Create webhook on Greenhouse for InterviewVector
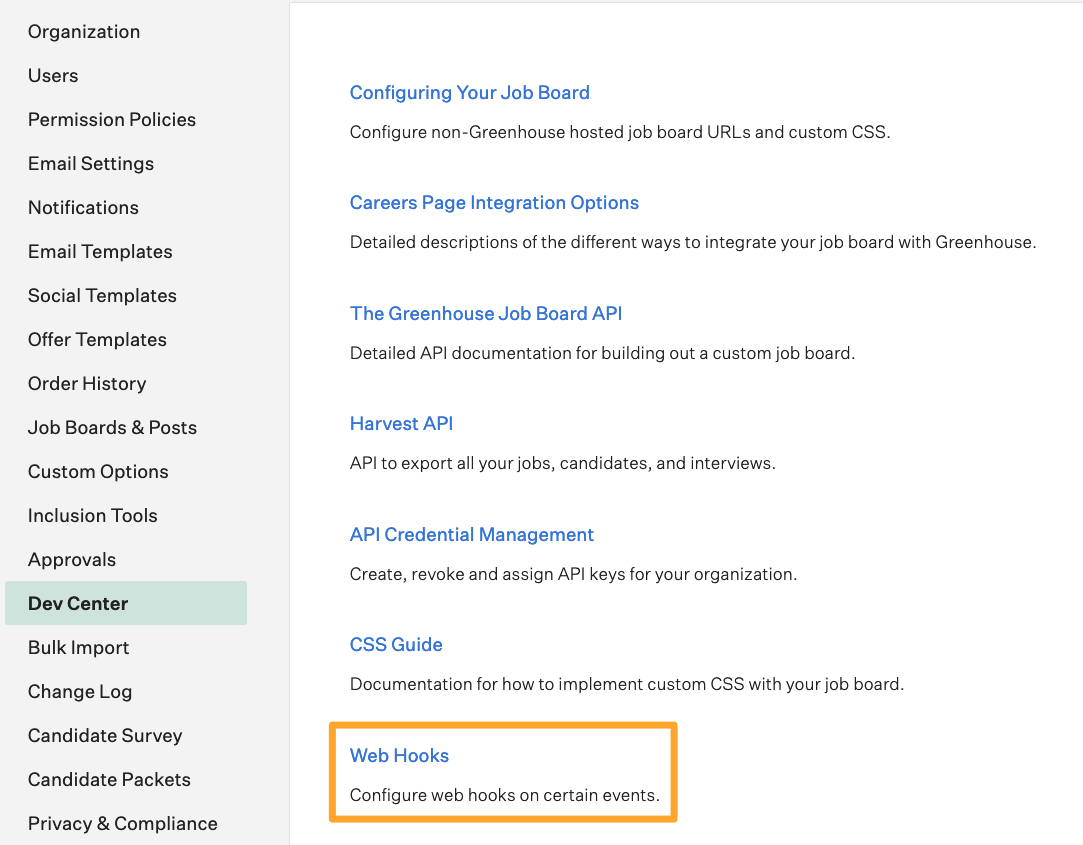
To enable the integration, click the Configure icon ![]() in the upper right corner and select Dev Center on the left.
in the upper right corner and select Dev Center on the left.

Click Web Hooks on the Dev Center. Click Web Hooks again on the next page.
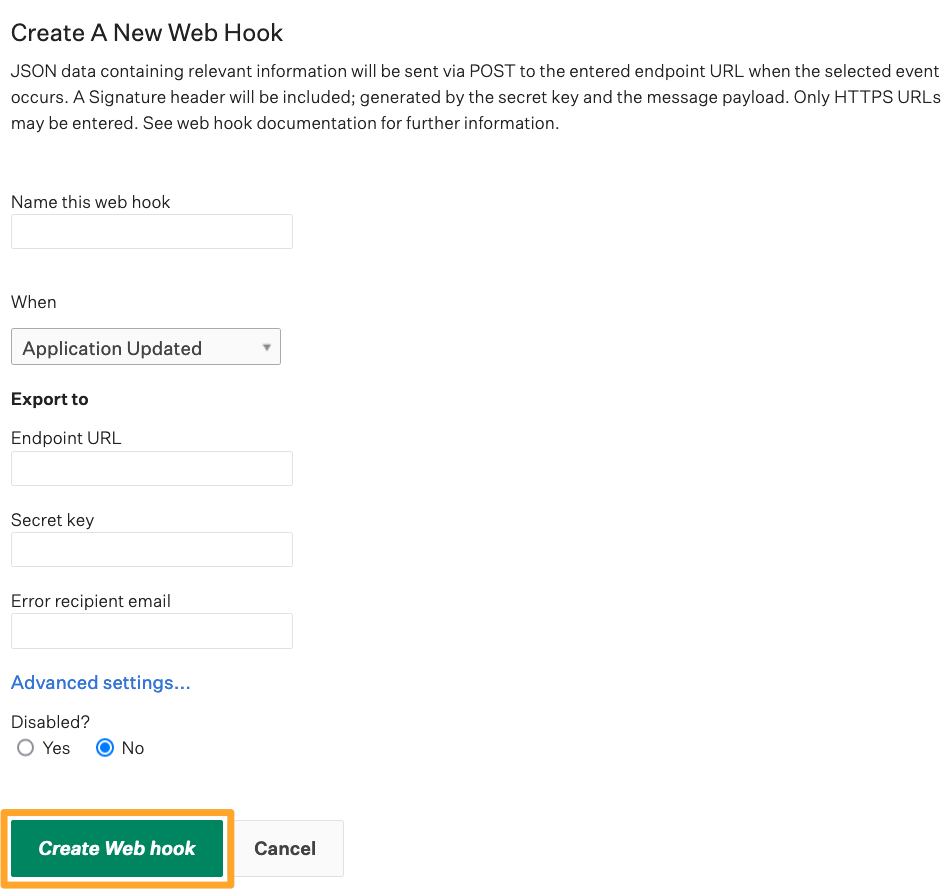
Enter the following information in the next page to configure a new webhook (Following needs to copied from InterviewVector Dashboard as shown in Screenshots above):
- Name: A descriptive name for your integration. Most customers choose InterviewVectorintegration
- When: The event that will be published to InterviewVector. Select the following options for this integration:
- Candidate has changed state
- Endpoint URL: The Endpoint URL provided by InterviewVector
- Secret Key: The Secret Key provided by InterviewVector
- Under Advanced settings
- Username: The Username provided by InterviewVector (leave password blank)
When you’re finished, click Create Web hook.
Your Greenhouse Recruiting account can now communicate with InterviewVectoraccount through webhooks. Check out the next sections for information on how to use the integration.
Using the InterviewVector integration with Greenhouse Recruiting
Add InterviewVector stage to an interview plan
Once the Greenhouse Recruiting / InterviewVectorintegration is setup for your organization, you can then add the “InterviewVector” stage as an interview stage for any job.
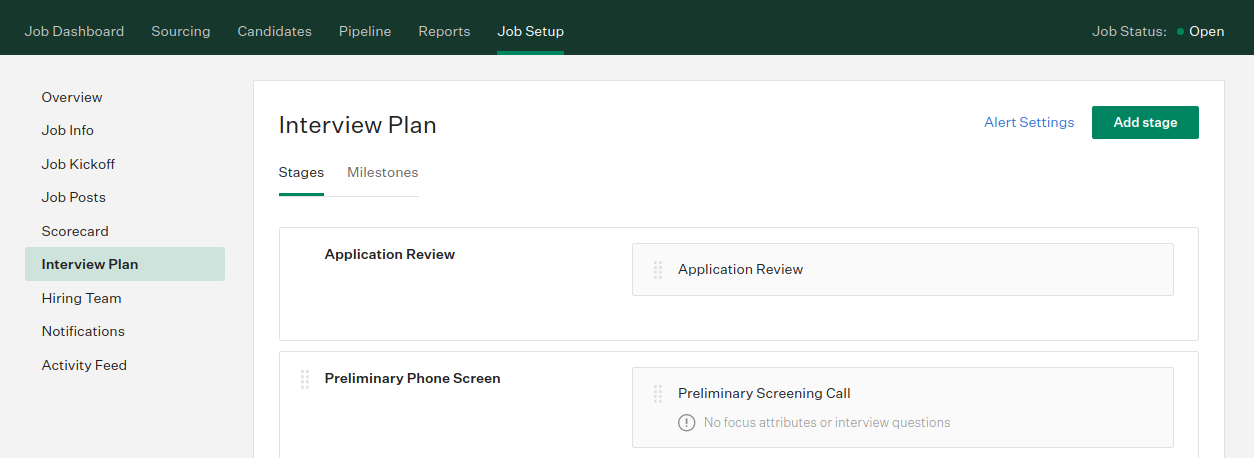
To add an interview stage to an existing job, navigate to your job (All Jobs > Job Name) and click Job Setup.

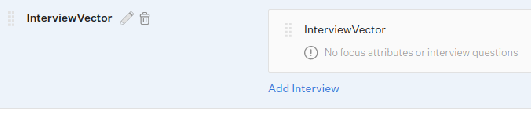
Select Interview Plan on the left side of the page and click + Add stage button (on top right corner).
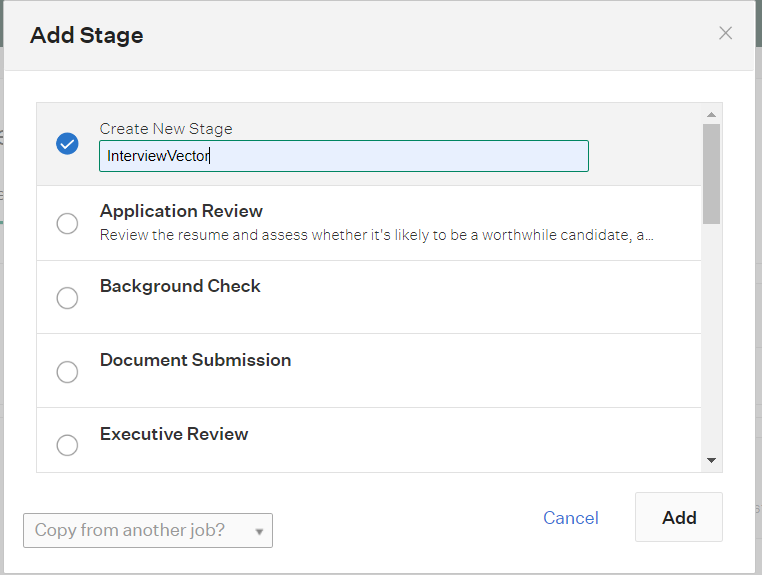
Create a stage named “InterviewVector” on the next window. When you’re finished, click Add to apply the stage to the job's interview plan.
After the InterviewVector stage has been added to the job’s interview plan stages, you can add multiple rounds for the InterviewVector stage by clicking “Add Interview.”
Note: Each position needs to be configured with this stage before interviews can be scheduled in Greenhouse via InterviewVector.
Configuring positions on InterviewVector
- Login to InterviewVector dashboard
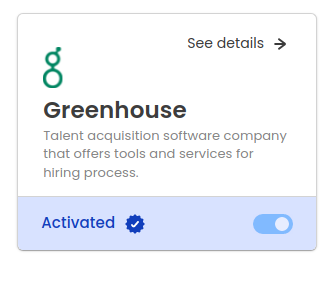
- Under the integration section, go to Greenhouse See details/Configure
You will see a screen like this:
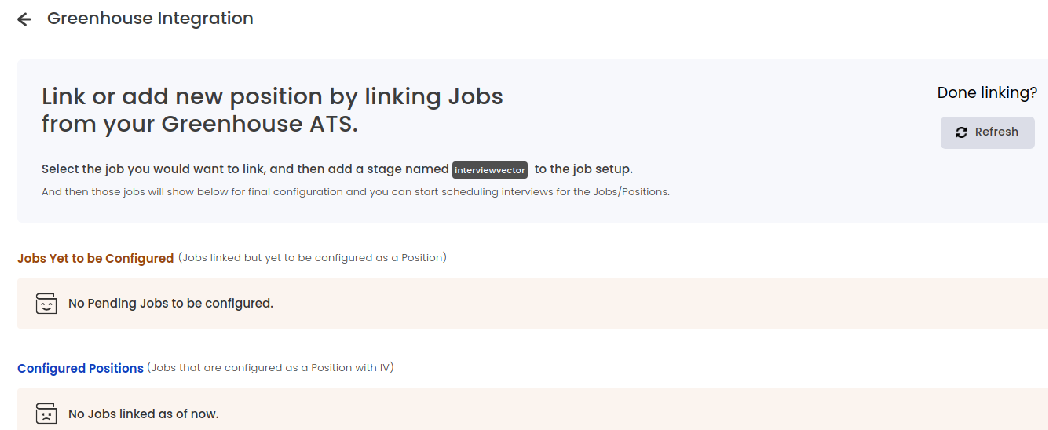
You need to click Refresh button, to fetch all the active jobs from Greenhouse which have InterviewVector as a stage.
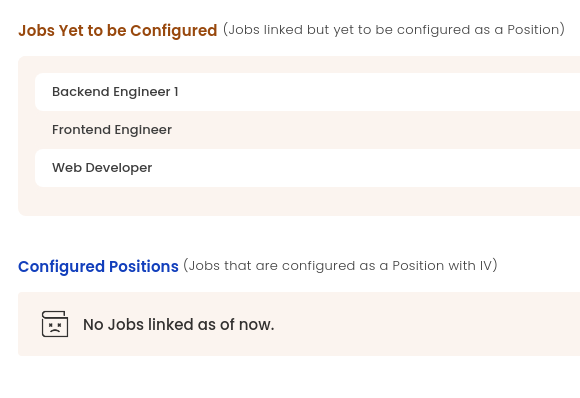
A list of recently fetched jobs will be displayed in the Jobs Yet to be Configured section.
The user needs to configure each job position before they can start scheduling interviews, for candidates belonging to that job.
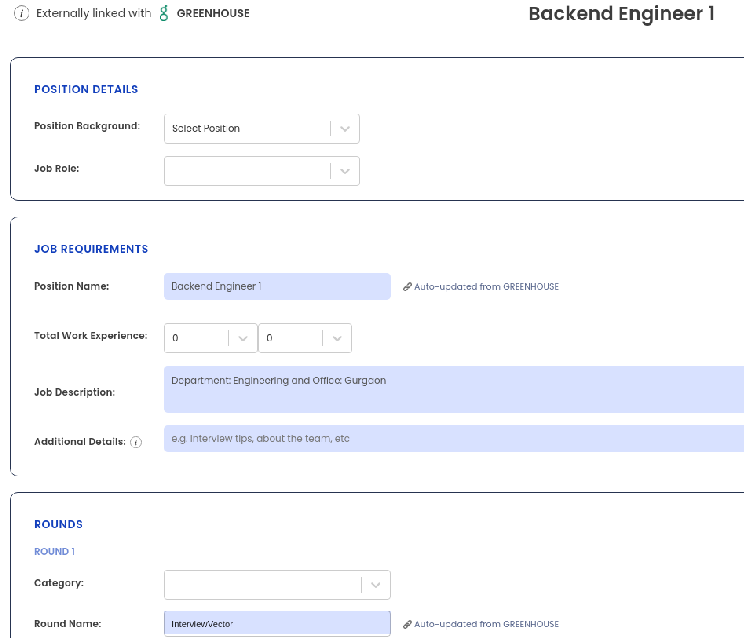
Click on Configure in the position modal to start configuring a position.
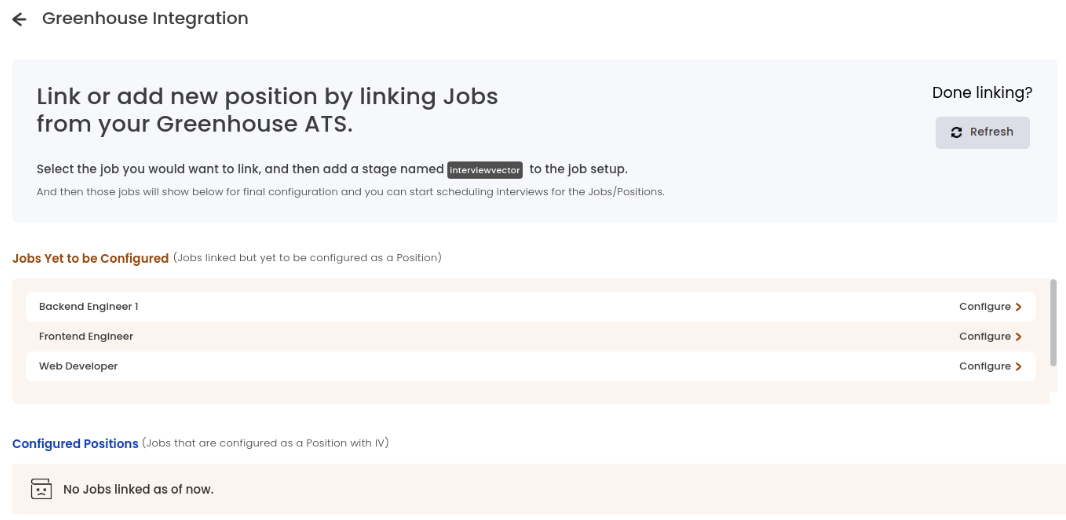
Note: Each position needs to be configured only once in our system for us to start scheduling interviews for it.
Please add the required details including - categories and role, round guide, etc. and save it.
Schedule interview
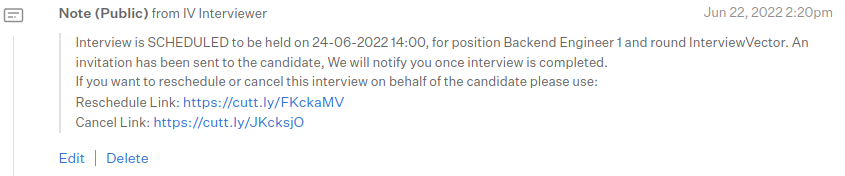
You need to move a candidate to InterviewVector stage to trigger a new interview (UNSCHEDULED status).
Once the candidate is moved to IV stage, an interview is created on our platform and an email is triggered to the candidate to schedule the interview.
You can also use the link posted on the Activity feed to fill the preferred interview slots timing.

Once an interview is scheduled, you can use Reschedule link / Cancel link in the Activity feed to reschedule or cancel the interview if needed.
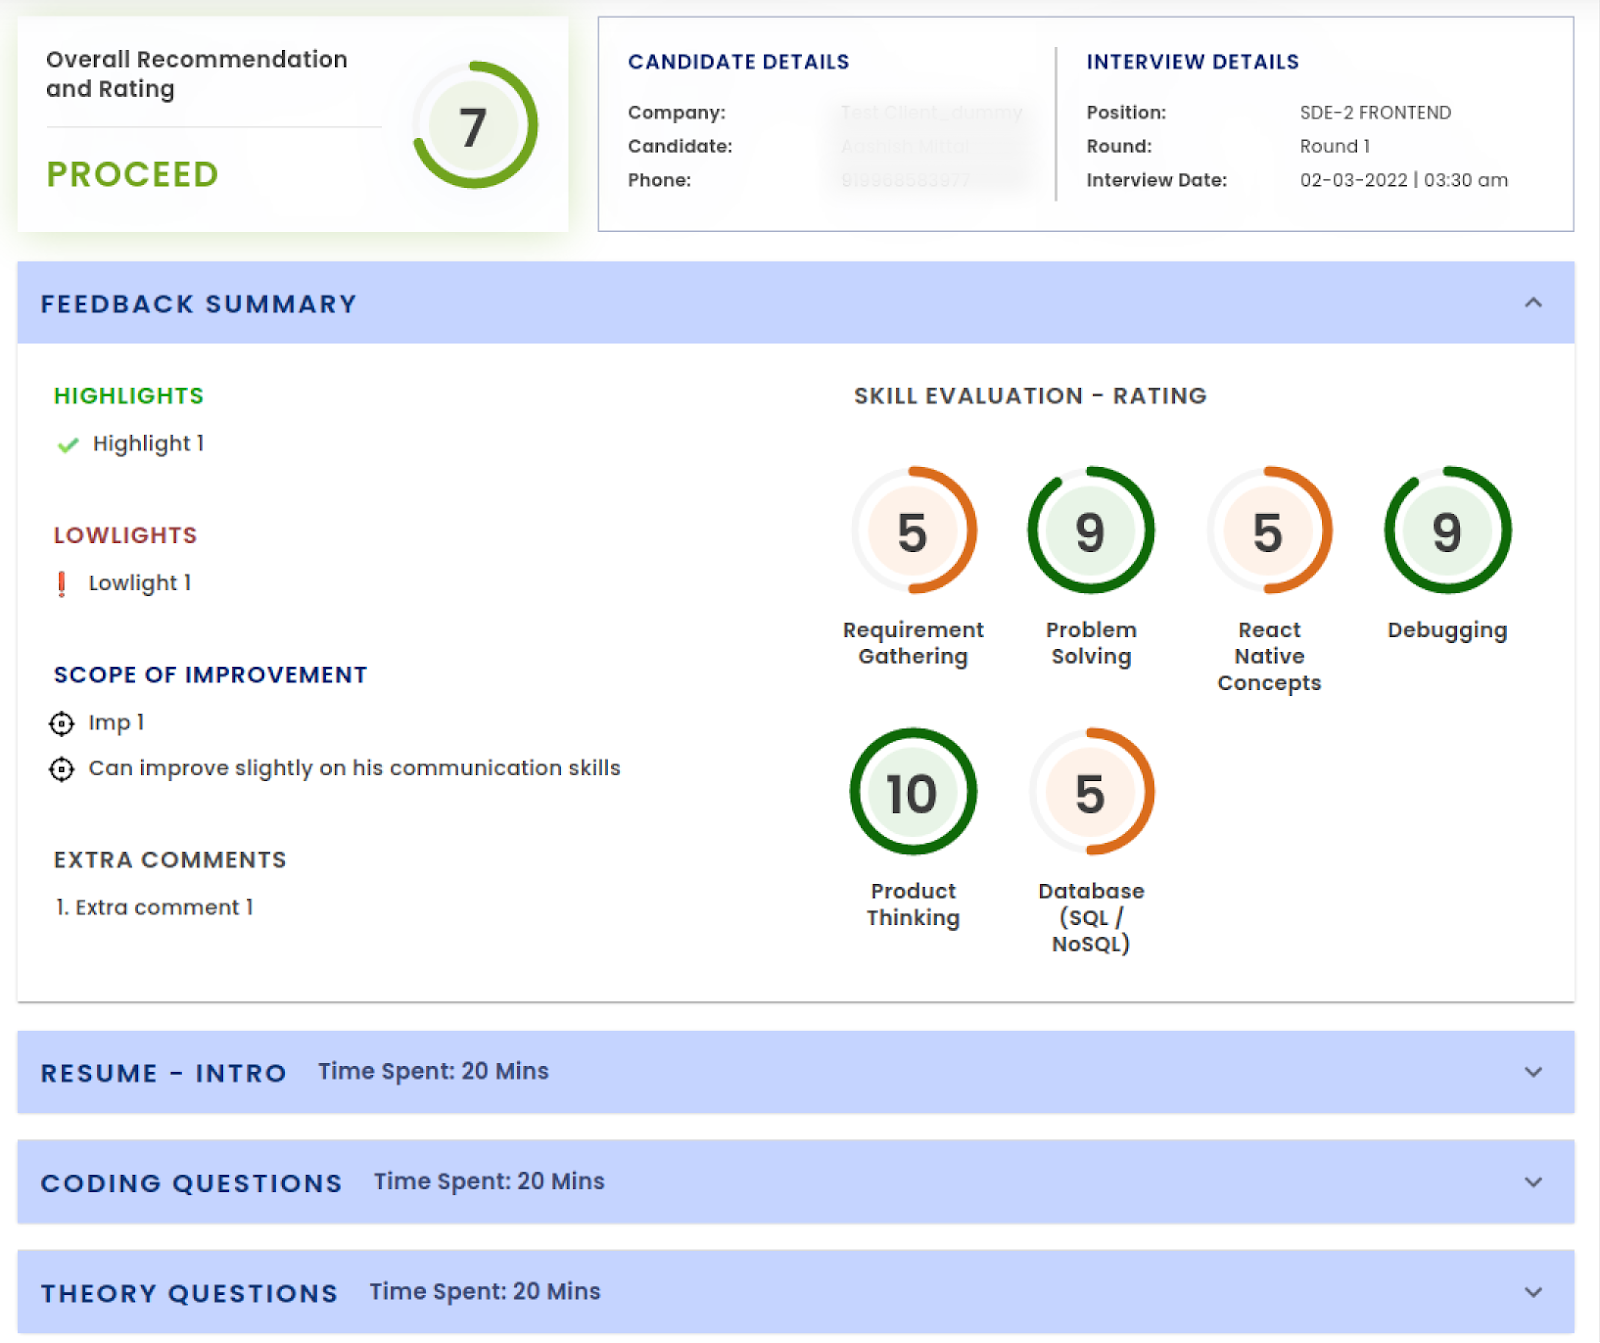
Once the Interview is completed, the Result is posted on the Activity feed with the Feedback Report link.
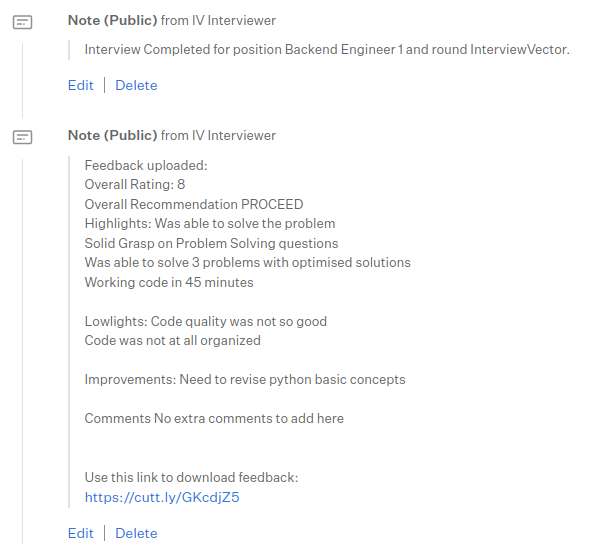
You can use that Feedback report link to view / download the feedback of the interview, downloaded feedback report will look like this:
Once feedback is posted on Greenhouse, candidate can be moved to the next stage based on your evaluation.
Additional resources
For additional information not covered here, reach out to aashish@interviewvector.tech.