Enabling Codility Interview in your Greenhouse Recruiting account helps your recruiters set up and schedule technical interviews via Codility Interview.
Using the integration, your recruiters can generate a Codility interview link for the candidate and notify both the candidate and the interviewers about the time, date, and connection details for the interview.
Note: To enable this integration, you will need to be an Admin user of both your Codility and Greenhouse Recruiting accounts.
Configure user setup permissions in Greenhouse Recruiting
In order to enable the Greenhouse Recruiting / Codility Interview integration, you will need the following developer permissions:
- Can manage ALL organization’s API Credentials
- Can manage and configure web hooks
Contact a Greenhouse Recruiting user in your organization with Site Admin level permissions with the additional user-specific permission Can edit another user's advanced permissions to apply the developer permissions to your account. Have the user with Site Admin level permissions edit your user account's permissions by navigating to the Configure icon > Users > Your Name.
The user with Site Admin level permissions should navigate to the User-Specific Permissions panel on your user page and expand the Developer Permissions dropdown menu.
Select Can manage ALL organization’s API Credentials and Can manage and configure web hooks so a check is in each checkbox. When finished, click Save.
Repeat as necessary for any other user that should have access to set up the integration.
Create Harvest API key for the Greenhouse Recruiting / Codility Interview integration
To create a Harvest API key for the integration, click the Configure icon in the upper right-hand corner, and navigate to Dev Center on the left-hand panel. From the Dev Center page, click API Credential Management.
From the API Credential Management page, click Create New API Key to generate the API key for Codility Interview.
In the Create New Credential dialog box, make the following selections:
- API Type: Harvest
- Partner: Codility Interview
- Description: Codility Interview Harvest API Key
When finished, click Manage Permissions to generate the Harvest API key and automatically assign it the appropriate permissions required by Codility: Codility Interview.
In the subsequent dialog box, click Copy to save your API key to your clipboard. Store the API key in a secure location to provide to Codility in the next step. Click I have stored the API Key once you have copied and saved the key.
On the subsequent page, confirm the following permissions are assigned to your new API key:
-
Candidates:
- POST: Add note
-
Users:
- GET: Retrieve user
If any of the permissions above are not checked, place a check in the box next to the appropriate permission. Click Save when finished.
Your Harvest API key for the Greenhouse Recruiting / Codility Interview integration is created and configured. You will provide the Harvest API key to Codility in a later step.
Obtain Greenhouse Recruiting user ID
In order for Codility to post information to your Greenhouse Recruiting account via Harvest API, Codility requires the user ID of an existing Greenhouse user in your organization.
Note: All information Codility posts to Greenhouse Recruiting via Harvest API will be associated with the user whose user ID is used.
To locate your user ID, click the Configure icon in the upper right-hand corner and select Users from the left panel.
From the Users page, click Export to Excel.
A spreadsheet will be downloaded to your computer. From the spreadsheet, navigate to the User ID column and copy the user ID value inline with your name. Save the user ID to provide to Codility in the next step.
Provide Harvest API key and user ID to Codility
Next, log into Codility and navigate to My Account > Integrations. Scroll down the list of integrations to find Greenhouse - Interview and click Enable.
In the window that appears, copy the Webhook secret key and Webhook header identity. Save these values to provide to Greenhouse Recruiting in the next step.
Paste your Harvest API key and Greenhouse user ID, then click Save.
Create webhook in Greenhouse Recruiting
To create the webhook, navigate to the Web Hooks page in Greenhouse Recruiting. (Configure > Dev Center > Web Hooks > Web Hooks)
On the Create A New Web Hook page, enter the following details:
- Name: Codility Interview
- When: Candidate has changed stage
- Endpoint URL: https://app.codility.com/integrations/greenhouse/webhook/
- Secret Key: Paste the webhook secret key you saved from Codility
-
Advanced settings - Additional HTTP Headers: Type
codility-identity:, followed by the Codility Webhook header you saved in a previous step.
When you're finished, click Create Web hook at the bottom of the page.
That's it! Your Greenhouse Recruiting account and Codility account can now talk to each other. These settings make sure that the Codility Interview webhook correctly sends when a user moves a candidate into the appropriate stage.
Add Codility stage to job's interview plan
Once everything is configured, you need to set up Codility Interview as a stage in your job.
To do this for an existing job, navigate to a job (All Jobs > Job Name) and click Job Setup from the Job navigation bar. From the Job Setup page, navigate to Interview Plan on the left-hand panel.
Click Add Stage in the top right corner of the page.
From the Add Stage dialog box, select the Codelive Tech Interview stage. When finished, click Add at the bottom of the dialog box to add the stage to the job's interview plan.
Note: You can change the stage name if needed, but for the integration to be recognized by the integration, make sure to include the word "Codelive" in the new stage name.
Send and review Codility test
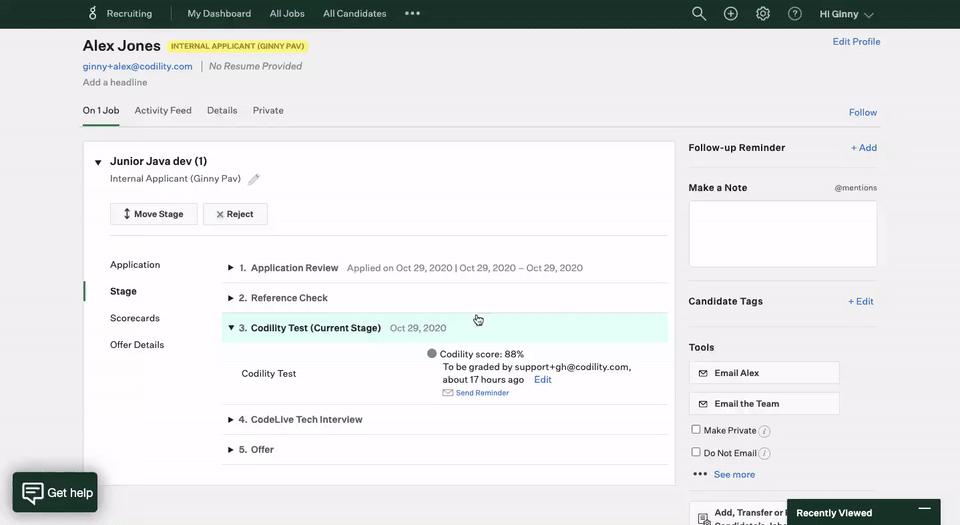
Find the necessary candidate and move them to the Codelive Tech Interview stage.
A Codility Interview link will be generated. In the meantime, you can request a candidate’s availability through the Request Availability feature.
Note: The Codility Interview integration can only create interviews with no preconfigured content.
Once you have confirmation from your candidate about the time slot, you can copy the Codility Interview link and click Schedule Interview. After choosing the right date and time, you can provide the Codility Interview link as Location and open the invite in Google Calendar to send it to your colleagues and the candidate.
Reviewing Candidates' Test Results
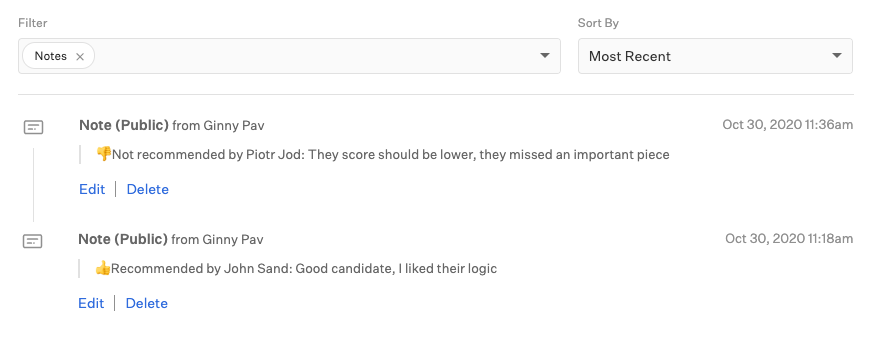
If you have the Codility Interview integration enabled, Codility allows you to assign a Reviewer to your Codility test. In this case, you will be able to see their feedback in Greenhouse in Last note and Activity Feed.
If you assign a new Reviewer and they decide to override previous scores, you can also track this in the Activity Feed in Greenhouse.
Note: We recommend having your technical reviewers use only Codility as developers with anonymized access and not adding them to your ATS. This will allow your reviewers to see only the candidate's code and not know any of their personal information which can help eliminate bias in the hiring process. You can see more information on Codility's anti-bias features here.
Additional support
If you have any problems completing these steps, contact support@codility.com.